Want lớn easily correct your backlit photos?
Follow the step-by-step procedure laid out in our Correct shadows & highlights in your photos tutorial & apply your learnings lớn the sample tệp tin provided in the tutorial.
The Shadow/Highlight command is one method for correcting photos with silhouetted images due to lớn strong backlighting or correcting subjects that have been slightly washed out because they were too close to the camera flash. The adjustment can also be used for brightening areas of shadow in an otherwise well‑lit image. The Shadow/Highlight command does not simply lighten or darken an image; it lightens or darkens based on the surrounding pixels (local neighborhood) in the shadows or highlights. For this reason, there are separate controls of the shadows and the highlights. The defaults are set to fix images with backlighting problems.
Bạn đang xem: Yêu cầu phần mềm
The Shadow/Highlight command also has a Midtone Contrast slider, Black đoạn clip option, và White clip option for adjusting the overall contrast of the image, and a màu sắc Correction slider for adjusting saturation.
Keep in mind that the Shadow/Highlight command applies adjustments directly to the image & will discard image information. For nondestructive image editing, it is recommended that you use adjustment layers or Camera Raw. See Adjustment và fill layers và Introduction to Camera Raw.
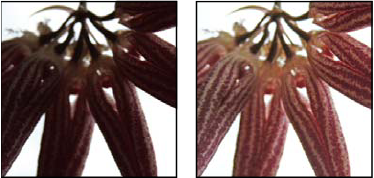
Original image, and Shadow/Highlight Correction applied
Adjust image shadows and highlights
Choose Image > Adjustments >Shadow/Highlight.
Make sure that the Preview option is selected in the dialogbox if you want the image lớn be updated as you make adjustments.
Adjust the amount of lighting correction by moving theAmount slider or entering a value in the Shadows or Highlights percentagebox. Larger values provide either greater lightening of shadowsor greater darkening of highlights. You can adjust both Shadowsand Highlights in an image.
To increase shadow detail in an otherwise well-exposedimage, try values in the 0-25% range for Shadows Amount & ShadowsTonal Width.
Xem thêm: Phim Ma Hồng Kông Xưa - Top 10 Phim Ma Hồng Kông Hay Nhất Từ Xưa Đến Nay
Click OK.
Shadow/Highlight command options
Amount
Controls (separately for the highlight & shadow values in the image) how much of a correction khổng lồ make.
Extreme Amount values may lead khổng lồ a crossover, where what started as a highlight becomes darker than something that started as a shadow; this can make the adjusted images look ‘unnatural’.
Controls the range of tones in the shadows or highlights that are modified. Smaller values restrict the adjustments khổng lồ the darker regions for shadow correction and the lighter regions for highlight correction. Larger values increase the range of tones that are adjusted further into the midtones. For example, at 100% the shadow tonal width slider affects the shadows the most, the midtones are partially affected, but the brightest highlights are not affected. Tonal width varies from image lớn image. Too large a value may introduce halos around dark or light edges. The default settings attempt to lớn reduce these artifacts. Halos may also occur when the Shadow or Highlight Amount values are too large.
Tonal Width is mix to một nửa by default. If you find that you are trying lớn lighten a dark subject but the midtones or lighter regions are changing too much, try reducing Shadow Tone Width toward zero so that only the darkest regions are lightened. If, however, you want to lớn brighten the midtones as well as the shadows, increase Shadows Tonal Width toward 100%
Controls the kích cỡ of the local neighborhood around each pixel.Neighboring pixels are used khổng lồ determine whether a px is in theshadows or highlights. Moving the slider lớn the left specifies asmaller area, và moving it khổng lồ the right specifies a larger area.The optimum local neighborhood size depends on the image. It’s bestto experiment with the adjustment. If the radius is too large, theadjustment tends to lớn brighten (or darken) the whole image ratherthan brightening the subject only. It’s best khổng lồ set the radius toroughly the kích thước of the subjects of interest in the image. Experimentwith different Radius settings khổng lồ obtain the best balance betweensubject contrast and differential brightening (or darkening) ofthe subject compared lớn the background.
Adjusts the brightness in a grayscale image. This adjustmentis available only for grayscale images. Moving the Brightness sliderto the left darkens a grayscale image, và moving the slider tothe right lightens a grayscale image.
Adjusts the contrast in the midtones. Move the slider tothe left lớn reduce the contrast và to the right lớn increase thecontrast. You can also enter a value in the Midtone Contrast box.A negative value reduces contrast, & a positive value increasescontrast. Increasing midtone contrast produces greater contrastin the midtones while tending to darken the shadows and lightenthe highlights.
Specifies how greatly the shadows and highlights are clippedto the new extreme shadow (level 0) và highlight (level 255) colors inthe image. Larger values produce an image with greater contrast.Be careful not to make the clipping values too large, because doingso reduces detail in the shadows or highlights (the intensity valuesare clipped & rendered as pure black or pure white).


